
Creating a Second Identity in Outlook Express
Please Note: These
instructions are for users,
who have experience setting up software programs.
These instructions are
for Outlook Express Version 5.5 and Version 6.
To check which version you are currently running, click on the Help Guide in
Outlook Express, select
"About Outlook Express," a window will open showing you
which version you are using.
To update your browser and mail program go to:
www.microsoft.com
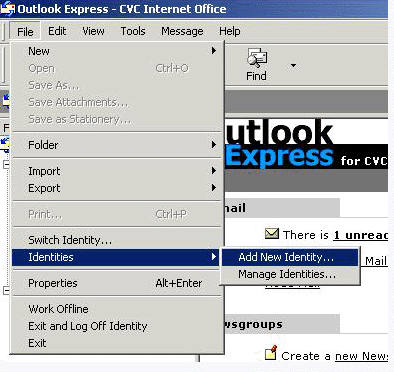
1. Open
Outlook Express. Click on the "File" menu in the top left hand corner and
select "Identities."
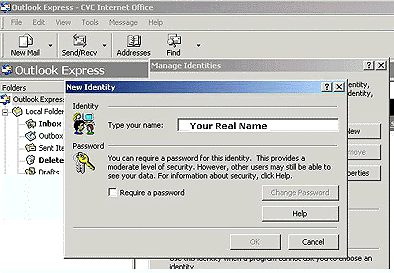
2. A box will appear asking
you to type a name for this "Identity." Type in "Your Real Name"
and click "OK."
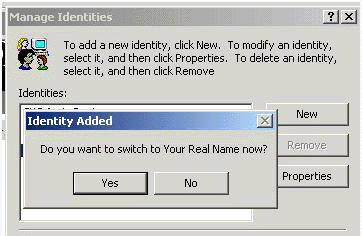
3. A smaller box will appear
asking if you would like to switch to this new identity,
click "Yes."
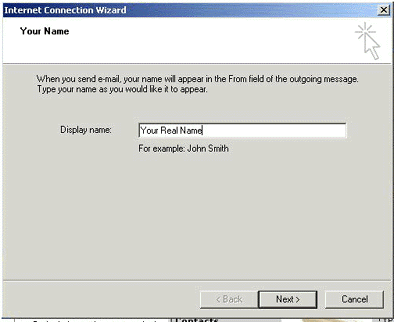
4. The "Internet Connection Wizard" will come
up asking you for a "Display Name." You
may enter "Your Real Name" or any name you
choose. Click "Next" to continue.
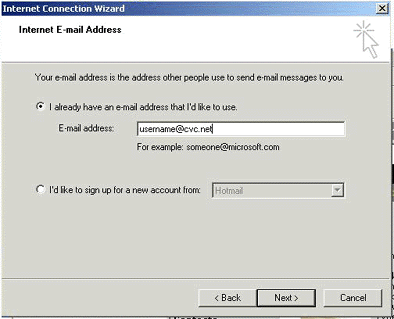
5. In the "Internet E-mail
Address" window enter the new "Identities e-mail address"
(example: username@cvc.net). Click "Next"
to continue.
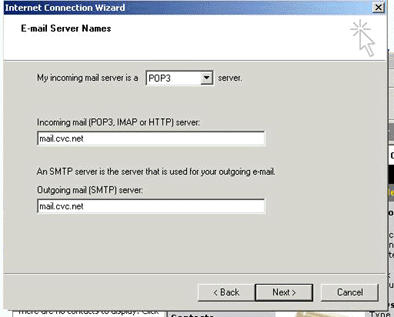
6. In the "E-mail Server Names" window complete the following:
a.) "My incoming
mail server is a" select: POP3.
b.) In the field "Incoming mail (POP3,
IMAP or HTTP) server"enter in lowercase,
no spaces:
mail.cvc.net
c.) In the field "Outgoing mail (SMTP)
server" enter in lowercase, no spaces:
mail.cvc.net
Click " Next" to continue.
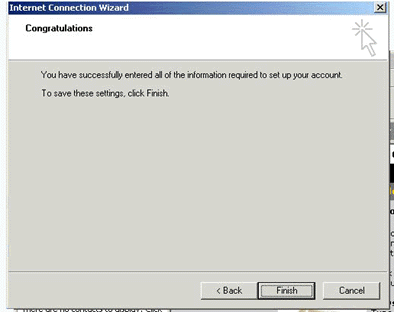
7. The next window will tell you have
completed the necessary information required
to set up this "Identity." To
save the settings, click "Finish."
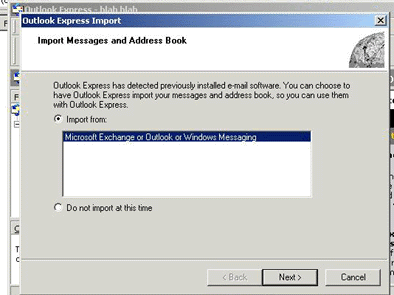
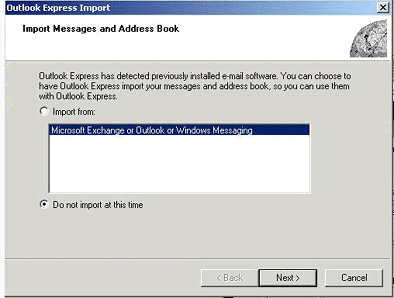
8. Outlook Express will then ask if you
would like to "Import Messages and an Address
Book." If you would like to
import this information, leave the mark on "Import from"
and click "Next" to
continue. If you do not want to import files, go to step 9.
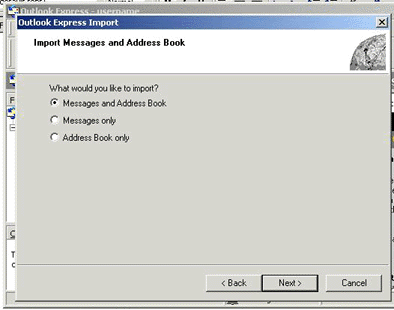
8a. If you would like to
import both an "Address Book and Messages", leave the mark on
the "Messages and Address
Book." Click "Next" to continue.
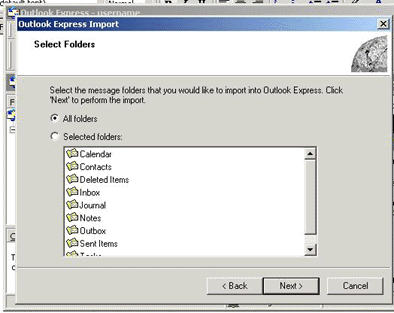
8b. Under "Select Folders," you can choose to
import all folders or select the ones
you wish to import.
Click "Next" to continue.
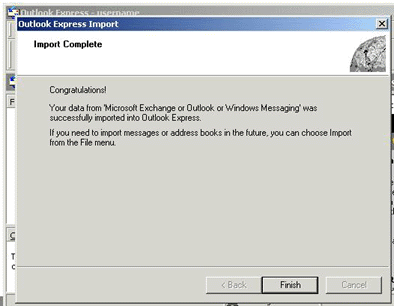
8c. In the next window it will tell you
that your import is complete. Click "Finish" to save
the settings.
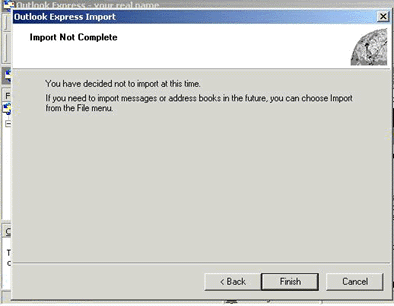
9. To skip importing files, select "Do not import at this time" and click "Next" to continue.
9a. The final window in Outlook Express
will tell you that the "Import is not complete
and that you may import at any
time through the File menu." Click "Finish."
To verify that your e-mail settings are properly set, please complete the following steps.
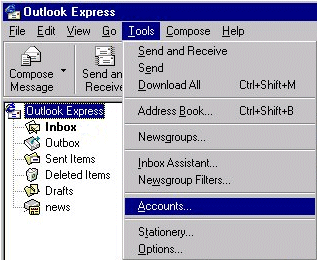
1. At the top of the Outlook Express window, click on the "Tools" menu and select "Accounts".
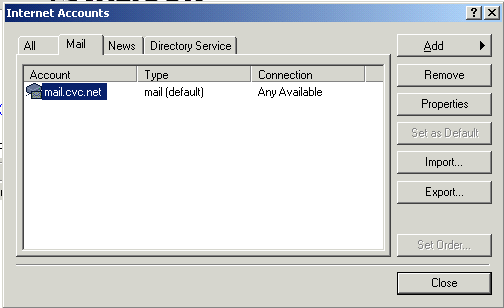
2. At the top of the Internet Accounts screen, click on the "Mail" tab. Click once on the mail account so it becomes highlighted, then click on the "Properties" button (right side of the screen, third button down).
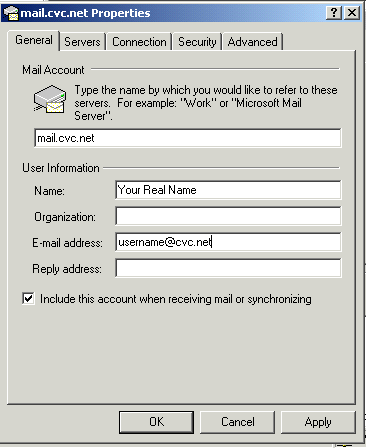
3. In the Properties window, "General" screen, verify the following settings:
Mail Account - Should contain the mail server addressing for your e-mail account (example shown below).
Name - Should contain your real name or business name.
Organization - Optional Setting, this field can contain your organization's name.
E-mail Address - Make sure the correct e-mail address is showing (example shown below).
Reply Address - Optional Setting, this field can contain your e-mail address, but make sure the address is correct.
Include this account when receiving mail or synchronizing - This setting should be selected (check marked).
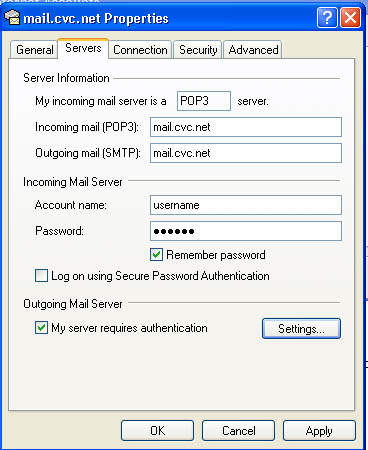
4. At the top of the Properties window, click on the "Servers" tab and verify the following settings:
My Incoming mail server is a: POP3 sever should be showing.
Incoming Mail (POP3): This setting should contain the mail server addressing assigned to your e-mail account (example shown below).
Outgoing Mail (POP3): This setting should contain the mail server addressing assigned to your e-mail account (example shown below).
Incoming Mail Server, Account Name: This should contain your mailbox username.
Incoming Mail Server, Password: This should contain your mailbox password.
Log on using Secure Password Authentication: Should not be selected.
Outgoing Mail Server, My Server Requires Authentication: This option should be selected.
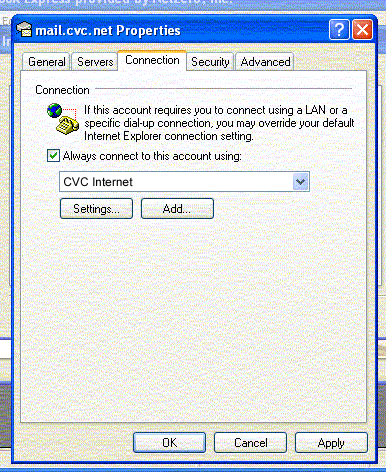
5.) At the top of the Properties window, click on the "Connection" tab. In the Connection screen, make sure "Always connect to this account" using is selected and that "CVC Internet" is showing in the white field below.
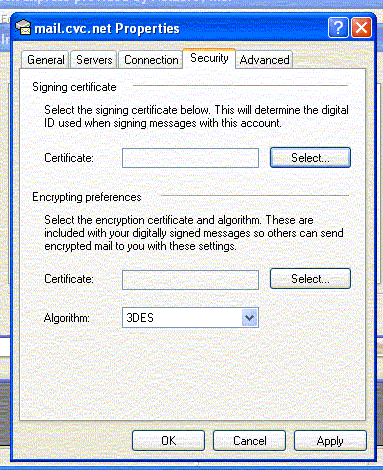
6. At the top of the Properties window, click on the "Security" tab. In the Security screen, the only option that should be active, is the "Algorithm (3DES)".
7. At the top of the Properties
window, click on the "Advanced" tab. In the Advanced screen,
verify the following options:
In the section "Server Timeouts", move the arrow to: Long 5 minutes
In the section "Sending", Do Not select the option "Break apart messages larger than".
In the section "Delivery", Do Not select the option "Leave a copy of messages on server".

8. At the bottom of the Properties window, click on the "Apply" button, then click on the "OK" button.
9. In the "Internet Accounts" window, click on the "Close" button.
10. In the "Outlook Express" main window, click on the "File" menu (located at the top of the Outlook Express window) and select "Close".
You're Finished! To change to your new identity (or second mailbox), open Outlook Express, click on the File menu, select Switch Identity and select the Identity you would like to change to. Remember, you must use your primary username and password to log on to the Internet. Your second identity is only for mail and will not allow you to access the Internet.
Copyright © 1996-2008, CVC Internet, LLC. All rights reserved.
Certain names, logos, designs, titles, words or phrases on this site
may
constitute trademarks, service marks or trade names of CVC Internet,
LLC.,
or other entities which may be registered in certain jurisdictions.
This web site contains
links to other Internet sites, and such links are not
endorsements of any products or services of such sites, and no
information
in such Internet sites
has been endorsed or approved by CVC Internet, LLC.
CVC Internet, LLC
disclaims any responsibility, if some web site you link
to has material on it that offends you in any way. If problems or
questions arise with the use of any of the linked web sites, please
contact the company that owns or operates the Internet site.