
Windows 2000
/ Microsoft Explorer / Outlook Express
Configurations for CVC Internet, LLC
Please Note: These
instructions are for users who
have experience setting up software programs.
If you notice a
difference in setup windows, please take the general
information listed below and apply them in the appropriate windows.
*************************************************************
DO NOT MAKE ANY OF THESE
CHANGES,
WITHOUT YOUR WINDOWS OPERATING SYSTEM CD/DISKS.
(Disks are only needed if you need to install a component
in the Network)
*************************************************************
- Step 1 - Dialup Networking -
1.)
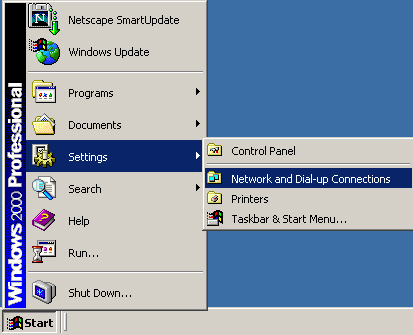
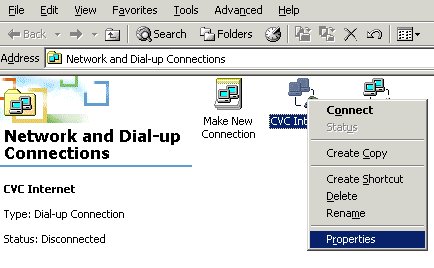
Select Start and then Settings. Then click
on Network and Dial-up
Connections (see example below).
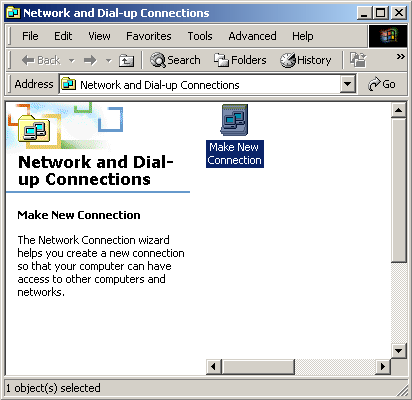
2.) Double click on Make New Connection (see example below).
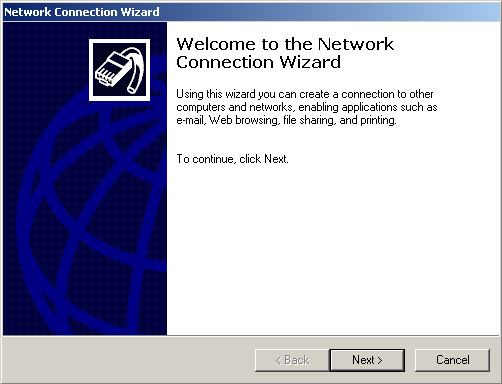
3.) In the Network Connection Wizard Welcome Page, click Next
(see example below).
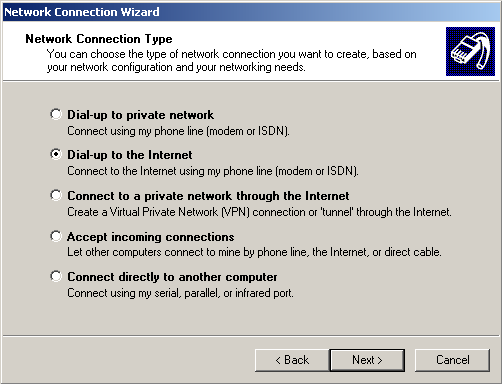
4.) In the Network Connection Type window, select Dial-up to the
Internet,
then click Next (see example below).
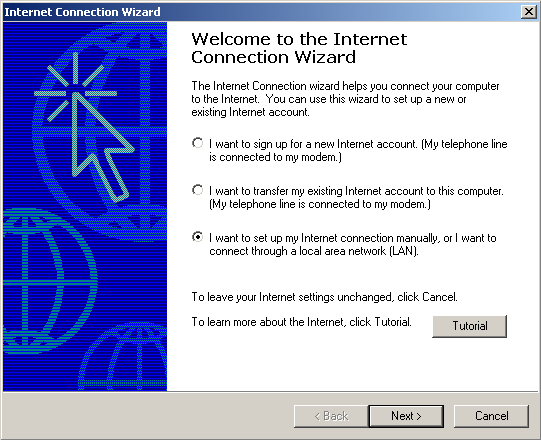
5.) In the Welcome to the Internet Connection Wizard window, select I want to set up my Internet connection manually, then click Next (see example below).
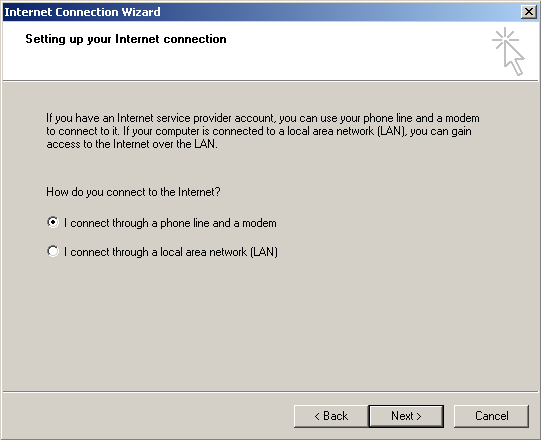
6.) In the Setting up your Internet connection window, select I
connect through
a phone line and a modem, then click Next (see example
below).
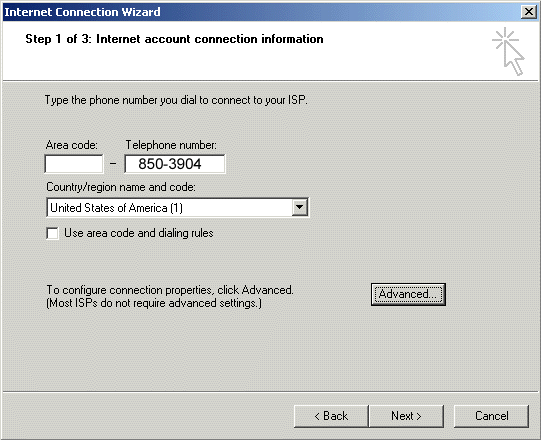
7.) In the window, Step 1 of 3: Internet account connection information, enter the following:
Area code: Leave blank
Telephone number: 850-3904
County/region name and code: select United States of America
(1)
Towards the bottom of the window, click on the Advanced button (see example below).
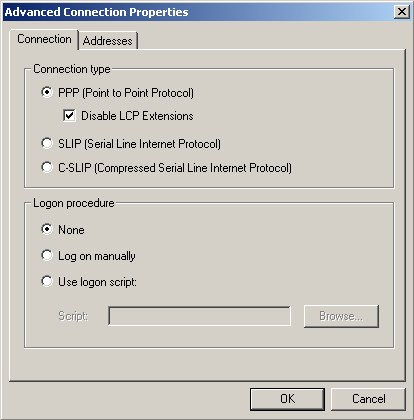
8.) In the Advanced Connection Properties window, Connection
screen,
select PPP and check Disable LCP Extensions. Towards the
top of the
Advanced Connection Properties window, click the Advanced tab
(see example below).
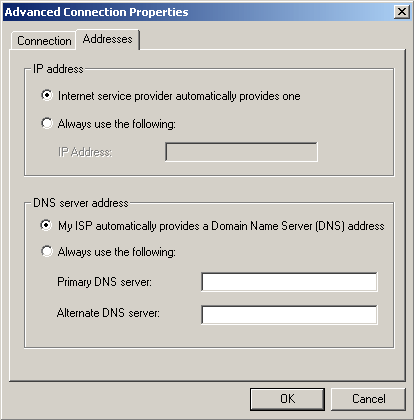
9.) In the Advanced Connection Properties window, Addresses screen,
select Internet service provider automatically provides one,
and
My ISP automatically provides a Domain Name Server (DNS)
address (see example below).
At the bottom of the window, click OK.
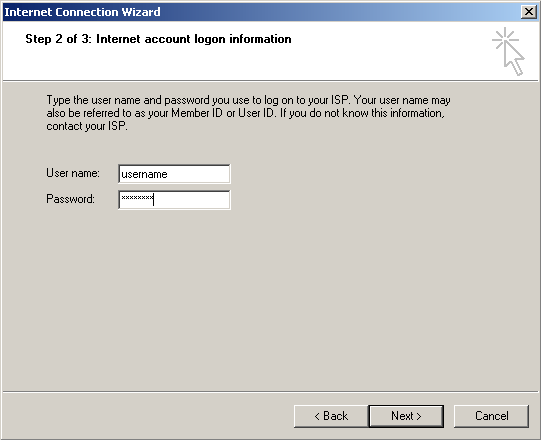
10.) In the Internet Connection Wizard, Step 2 of 3: Internet
account logon
information window, enter your CVC Internet username (in
lowercase and
only your username, do not add @cvc.net), and password
(in lowercase),
then click Next (see example below).
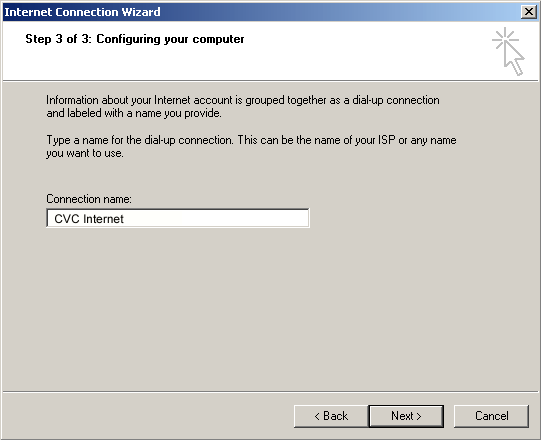
11.) In the Step 3 of 3: Configuring your computer window, Connection
name screen,
enter CVC Internet, then click Next (see example below).
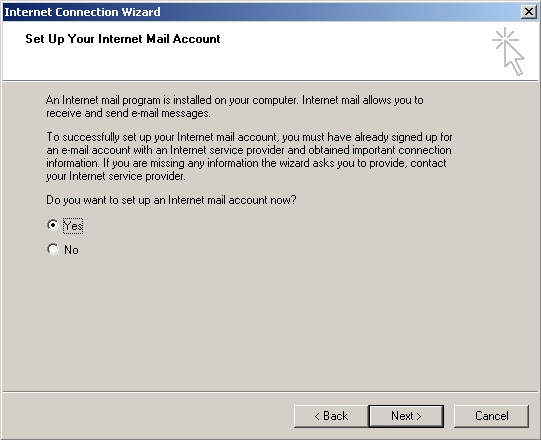
12.) In the Set Up Your Internet Mail Account screen, select Yes,
then click Next (see example below).
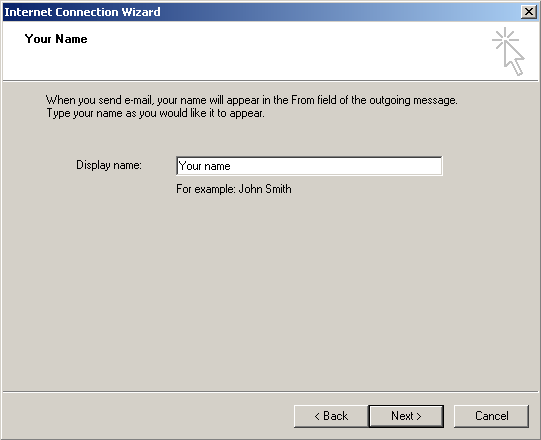
13.) In the Your Name window, enter the name you would
like to display
on your e-mail's, then click Next (see example below).
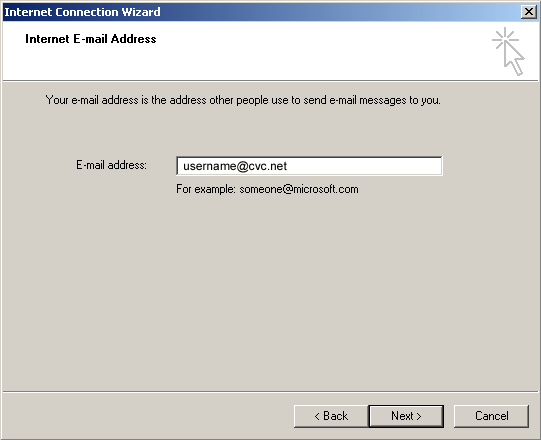
14.) In the Internet E-mail Address screen, enter your
e-mail address
(example: username@cvc.net),
then click Next (see example below).
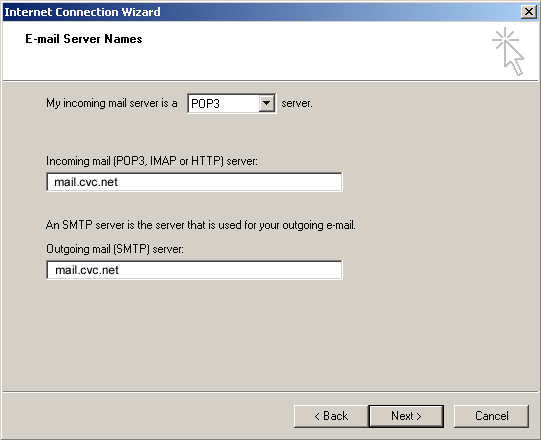
15.) In the E-mail Server Names, select POP3 for
the My incoming mail server,
then enter mail.cvc.net for the Incoming mail server, and enter
mail.cvc.net for the
Outgoing mail server, then click Next (see example below).
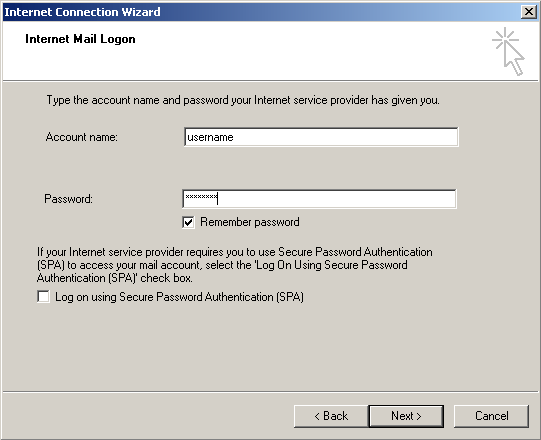
16.) In the Internet Connection Wizard, Internet Mail
Logon window, enter your
CVC Internet username in the Account Name box (only enter the
username,
do not enter @cvc.net and make sure the name is in all lowercase),
then enter
your password in the Password box (enter in all lowercase), select
Remember
Password by clicking on the box (if you wish not to save the
password, do not
select this option), then click on Next (see example below).
17.) Setup for the Dial-up Networking is now complete. Click Finish.

18.) In the Network and Dial-Up Connection window, single right click on your CVC Internet icon and select Properties.
19.) In the Properties window, verify the Phone Number as being 850-3904. Click on the Configure button under the Connect using field.
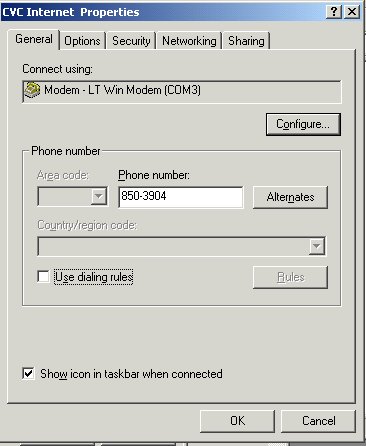
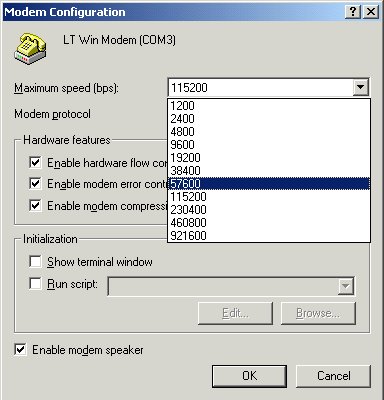
20.) In the Modem Configurations screen, lower the modem speed from 115200 to 57600. Click OK to return to the Properties screen. Be sure the Initialization options are not marked.
21.) In the Properties screen, click on the Alternates button (located next to the Dial-up Number). At the bottom of the screen verify:
- If number fails, try next number has a check mark
- Move successful number to top of list has a check mark
Click on the Add button to continue.
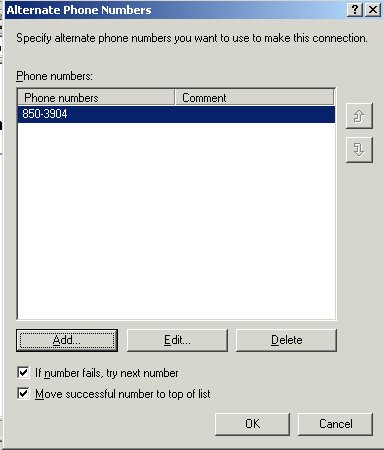
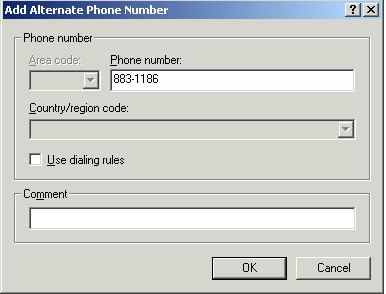
22.) In the Add Alternate Phone Number screen, enter the dial up number as 883-1186. Click OK to return to the Alternate Phone Number screen. Click OK to return to the Properties window.
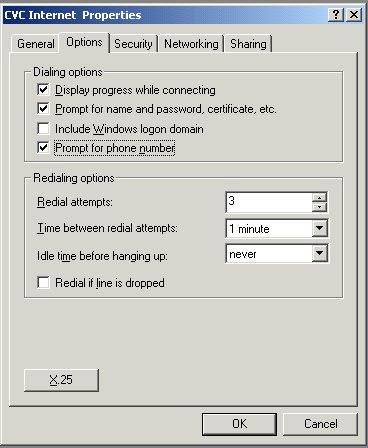
23.) In the Properties screen, click on the Options tab. In the Options screen verify the following:
Under Dialing options make sure the following are marked:
- Display progress while connecting
- Prompt for name and password, certificate, etc.
- Prompt for phone number
Under Redialing options make sure the following are selected:
- Redial attempts - 3
- Time between redial attempts - 1 minute
- Idle time before hanging up - never
Click on the Networking tab to continue.
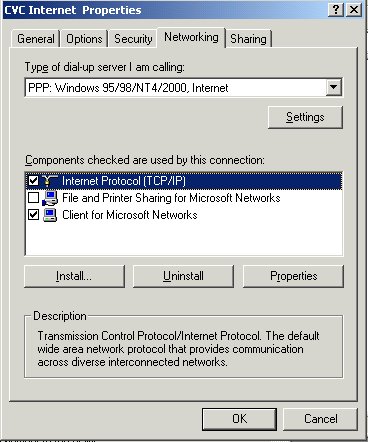
24.) In the Networking screen, under "Components checked are used by this connection" there should be a check mark by "Internet Protocol (TCP/IP)" and "Client for Microsoft Networks". Click once on "Internet Protocol (TCP/IP)" to make it highlighted and click on Properties under the window.
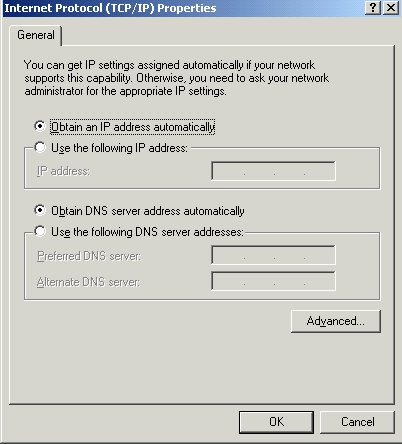
25.) In the TCP/IP Properties screen, mark the following:
- Obtain an IP address automatically
- Obtain DNS server address automatically
Click on the Advanced tab at the bottom of the screen to continue.
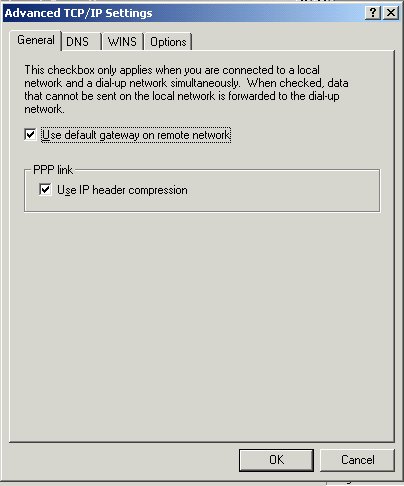
26.) In the Advanced screen, mark the following:
- Use default gateway on remote network
- Use IP header compression
Click on DNS to continue.
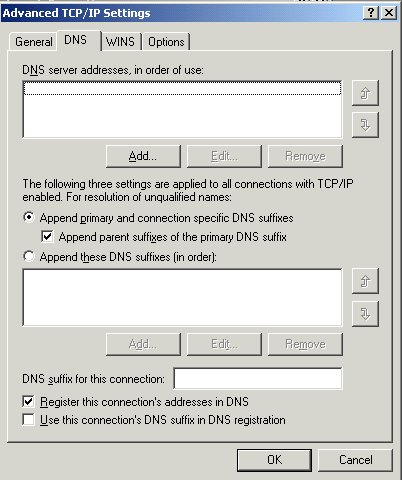
27.) In the DNS screen, mark the following:
- Append primary and connection specific DNS suffixes
- Append parent suffixes of the primary DNS suffix
- Register this connection's address in DNS
Click on WINS to continue.
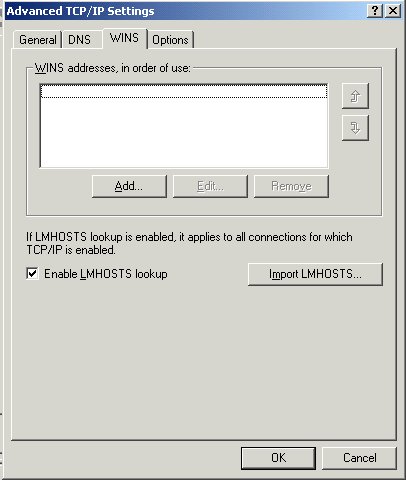
28.) In the WINS screen mark the option "Enable LMHOSTS lookup".
Click OK to return to the "Internet Protocol" screen.
Click OK to return to the "Networking" screen.
Click OK to return to the "Network and Dial-up Connections"
window.
Close remaining windows to return to the desktop.
- Step 2 - Browser Configurations -
1.) On the desktop (computer's main screen), double-click on the My Computer icon.
2.) In the My Computer window, double click on the Control Panel icon.
3.) In the Control Panel window, double click the Internet icon.
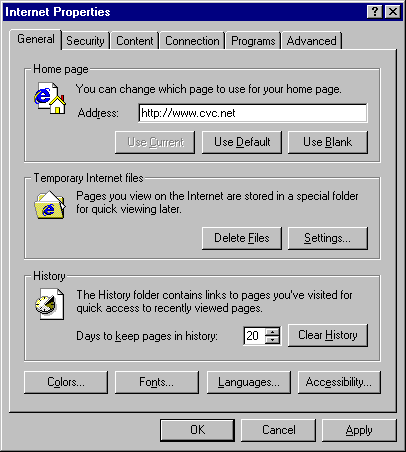
4.) In the Internet Properties screen, select the General tab.
On the General tab screen, Home
Page section, Address box: enter http://www.cvc.net.
At the bottom of the Internet Properties window, click on the Apply
button.
(sample screen below)
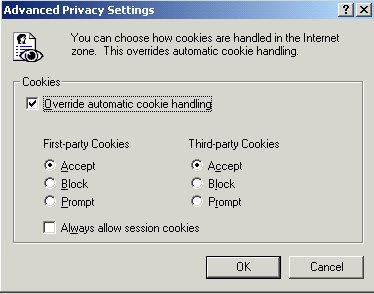
5.) At the top of the Internet Properties window, click on the Privacy tab. In the Privacy screen, click on the Advanced button.
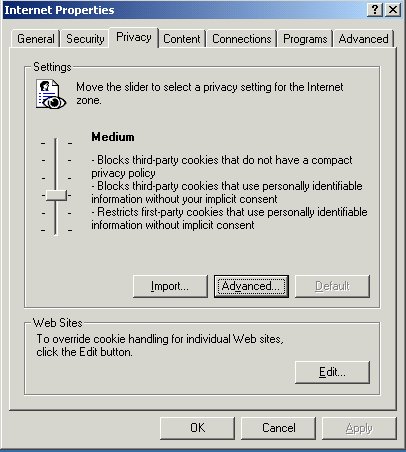
6.) In the Advanced screen, select:
-
"Override Automatic Cookie Handling"
-
"Accept - First Party Cookies
-
"Accept - Third Party Cookies"
-
"Always allow session cookies"
Click OK at the bottom of the Advanced screen. Click Apply at the bottom of the Privacy screen.
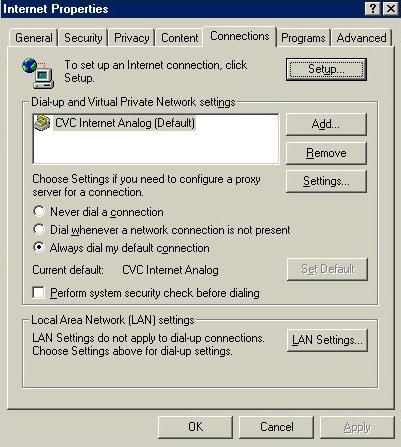
7.) Go to the top of the Internet Properties window, and click on the Connection tab.
8.) In the Connection screen, click on the bullet beside Always dial my default connection. To continue setup, click on the Settings button.
(sample screen below)
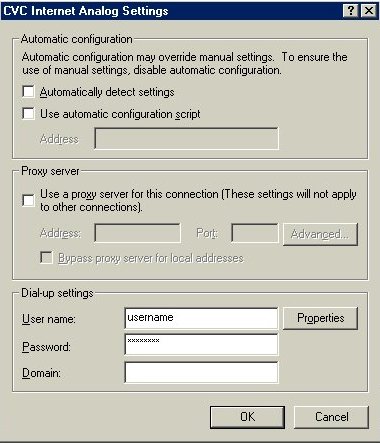
9.) In the Settings screen at the bottom of the screen, enter the following items:
-
In the Dial Up Settings box, User name box: enter your CVC Internet username (in lowercase, Do Not add @cvc.net).
-
In the Password box: enter your CVC Internet password (in lowercase).
-
In the Domain box: leave this box empty.
-
At the bottom of the Settings screen, click on the OK button. At the bottom of the Internet Properties window, click on the Apply button, then OK.
-
Back in the Control Panel, close the window with the "X" in the top right corner.
(sample screen below)
To verify that your e-mail settings are properly set, please complete the following steps.
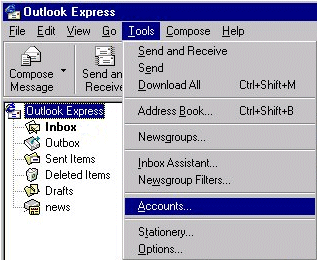
1. Open Outlook Express (you do not need to connect to the Internet - click "Work Offline" if your Connect To window appears). At the top of the Outlook Express window, click on the "Tools" menu and select "Accounts".
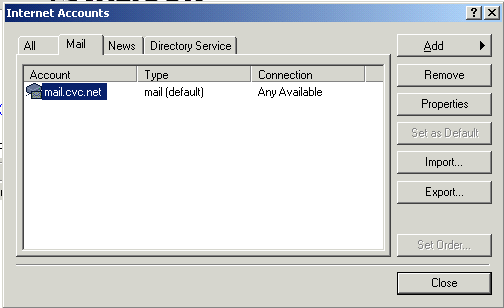
2. At the top of the Internet Accounts screen, click on the "Mail" tab. Click once on the mail account so it becomes highlighted, then click on the "Properties" button (right side of the screen, third button down).
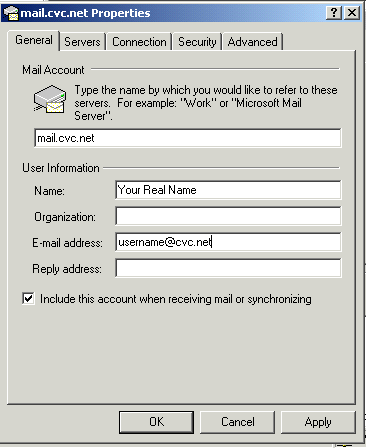
3. In the Properties window, "General" screen, verify the following settings:
-
Mail Account - Should contain the mail server addressing for your e-mail account (example shown below).
-
Name - Should contain your real name or business name.
-
Organization - Optional Setting, this field can contain your organization's name.
-
E-mail Address - Make sure the correct e-mail address is showing (example shown below).
-
Reply Address - Optional Setting, this field can contain your e-mail address, but make sure the address is correct.
-
Include this account when receiving mail or synchronizing - This setting should be selected (check marked).
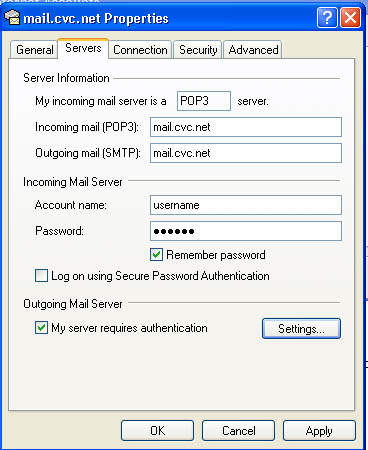
4. At the top of the Properties window, click on the "Servers" tab and verify the following settings:
-
My Incoming mail server is a: POP3 sever should be showing.
-
Incoming Mail (POP3): This setting should contain the mail server addressing assigned to your e-mail account (example shown below).
-
Outgoing Mail (POP3): This setting should contain the mail server addressing assigned to your e-mail account (example shown below).
-
Incoming Mail Server, Account Name: This should contain your mailbox username.
-
Incoming Mail Server, Password: This should contain your mailbox password.
-
Log on using Secure Password Authentication: Should not be selected.
-
Outgoing Mail Server, My Server Requires Authentication: This option should be selected.
5.) At the top of the Properties window, click on the "Connection" tab. In the Connection screen, make sure "Always connect to this account" using is selected and that "CVC Internet" is showing in the white field below.

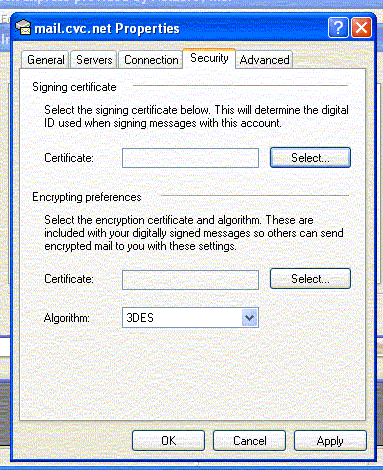
6. At the top of the Properties window, click on the "Security" tab. In the Security screen, the only option that should be active, is the "Algorithm (3DES)".
7. At the top of the Properties
window, click on the "Advanced" tab. In the Advanced screen,
verify the following options:
- In the "Server Port Numbers" section, "Outgoing mail (SMTP)" field, setting should be: 25
- The option "This server requires a secure connection (SSL)": Do Not select this option
- In the "Incoming mail (POP3)" field, the setting should be: 110
- The option "This server requires a secure connection (SSL)": Do Not select this option
In the section "Server Timeouts", move the arrow to: Long 5 minutes
In the section "Sending", Do Not select the option "Break apart messages larger than".
In the section "Delivery", Do Not select the option "Leave a copy of messages on server".

8. At the bottom of the Properties window, click on the "Apply" button, then click on the "OK" button.
9. In the "Internet Accounts" window, click on the "Close" button.
10. In the "Outlook Express" main window, click on the "File" menu (located at the top of the Outlook Express window) and select "Close".
You're Finished! For more information on using e-mail or browsing the Internet, please refer to the "Help" menu located within the e-mail software program.
Internet Explorer's Cache
To keep Internet Explorer running at it's best, make sure to periodically clean the cache. The cache stores graphics of sites you browse on the Internet, so the next time you revisit the site it will load the page much faster. But after extensive browsing the cache will become plugged, causing problems with browsing.
Cleaning The Cache -
1.) Click Tools in the top left corner of Internet Explorer, select Internet Options.
2.) Click on Delete Files, another window will appear stating "All Temporary Files Will Be Deleted", click OK to continue.
3.) When the hour glass disappears, click OK again to return to Internet Explorer.
Microsoft
Products
- Software Technical
Information -
FAQ’s Online Database
http://support.microsoft.com/directory/
Phone:
1-425-635-7222 (Windows 98/2000)
Phone:
1-425-635-7123 (Internet Explorer)
Phone:
1-425-637-9308 (Microsoft Programs)
<<<<< BACK TO CVC INTERNET'S HELP GUIDE
Copyright © 1996-2008, CVC Internet, LLC. All rights reserved.
Certain names, logos, designs, titles, words or phrases on this site
may
constitute trademarks, service marks or trade names of CVC Internet,
LLC.,
or other entities which may be registered in certain jurisdictions.
This web site contains
links to other Internet sites, and such links are not
endorsements of any products or services of such sites, and no
information
in such Internet sites
has been endorsed or approved by CVC Internet, LLC.
CVC Internet, LLC
disclaims any responsibility, if some web site you link
to has material on it that offends you in any way. If problems or
questions arise with the use of any of the linked web sites, please
contact the company that owns or operates the Internet site.