

Windows Microsoft
Explorer
Configurations for CVC Internet, LLC
Please Note: These
instructions are for users
who have experience setting up software programs.
If you notice a difference in
setup windows, please take the general
information listed below and apply them in the appropriate windows.
********************************************************************
DO NOT MAKE
ANY OF THESE CHANGES,
WITHOUT YOUR WINDOWS OPERATING SYSTEM CD/DISKS
(Disks are only needed in case you
need to install a component in the Network)
*******************************************************************
- Step 1 - Dialup Networking -
1.) When you turn on your computer system, Windows will load a main screen (the desktop). On the main desktop, double-click on the My Computer icon.
2.) In the My Computer window, double-click on the Dial-up Networking icon
(sample window below).

3.) In the Dial-Up Networking window, double-click on the Make New Connection icon
(sample window below).

4.) This will bring up a Make New Connection screen that contains two fields.
Insert the following information:

5.) The next screen will list the following fields, enter :

6.) The next screen will indicate, you have successfully created a Dial-up Networking connection called CVC Internet. Down at the bottom of the screen, click on the Finish button (sample screen below).
.
7.) You should now have a CVC Internet icon (two computers with CVC Internet underneath) located in the Dial-up Networking window. Single-click on the CVC Internet icon (to make it highlighted), then go to the top of the Dial-up Networking window, click on the File menu and select Properties. In the Properties window, General screen, check the following screens:
a.) Area Code field enter: 541
b.) Telephone Number: should show your CVC Internet dial-in phone number.
(make sure there is no 1 in front of the phone number).
c.) Country Code: should show United States of America (1)
d.) Use Country Code and Area Code: if you have this option,
make sure it is blank.
e.) Click on the Configure button under the "Connect Using" section and lower the modem
speed from 115200 to 57600
8.) In the Properties window, General screen, double-click on the Server Types button, or single click on the Server Types tab (option for Server Types will vary according to the version of Windows you are using, sample screen below).

9.) In the Server Types screen, Advanced Options section, select only Enable Software Compression (if the other options are selected, click on the box to remove the check mark).
In the next section, Allowed Network Protocols, select only TCP/IP (if the other options are selected, click on the box to remove the check mark).
To continue setup, double-click on the TCP/IP Settings button, or click once on the TCP/IP Settings tab (option for TCP/IP Settings will vary according to the version of Windows you are using, sample screen below).

10.) In the TCP/IP screen, select the following items:
Make sure these options are the ONLY items selected in this screen, then click
OK.
(sample screen below)
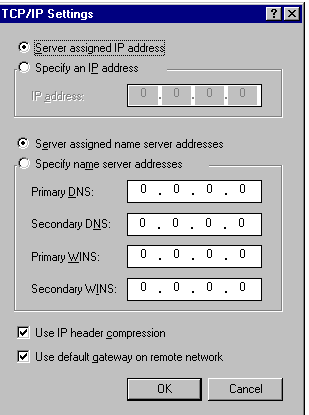
11.) Keep clicking on the OK button until you are back to the Dial-up Networking window. Your dialer is now set. For software programs that do not automatically put a CVC Internet dialer icon on the desktop, please refer to step 12, otherwise refer to step 13.
12.) (From step 11) In the Dial-up Networking window, right-click (once) on the CVC Internet icon and select Create Shortcut. This will bring up a screen stating: Windows cannot create a shortcut here. Do you want the shortcut to be placed on the desktop instead? Click Yes. This will place the CVC Internet dialer icon on your desktop. To finish dialer setup, please continue to step 13.
13.) To make sure the Windows Networking is set correctly, follow these steps:
***** DO NOT MAKE ANY OF THESE CHANGES WITHOUT
YOUR WINDOWS OPERATING SYSTEM CD/DISKS! ******
(Disks are only needed if you need to install a component in your
Network)
On the desktop, double-click on My Computer. In the My Computer window, double-click on the Control Panel icon. In the Control Panel window, double-click on the Network icon.
In the Network window, Configuration screen, the following items must be installed.
(sample window below)
If the above items are installed, go to step 17.
14.) If Client for Microsoft Networks is not installed, go to
step 19a.
15.) If Dial-Up Adapter is not installed, go to step 20a.
16.) If TCP/IP is not installed, go to step 21a.
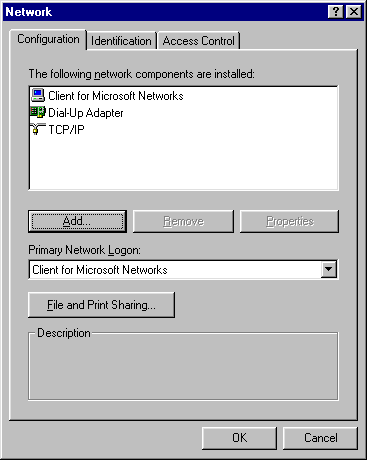
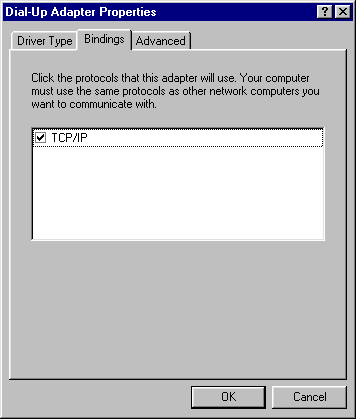
17.) Highlight the Dial-Up Adapter, click on Properties, then click on Bindings.
18.) Make sure only TCP/IP is checked, uncheck any other Protocol listed,
then click OK. This will take you back to the Network window, at
the bottom of this window click on the OK button.
Once you are back in the Control Panel window, click on the X at the top right-hand corner of the window (this close the window). And to get back to the desktop, click on the X at the top right-hand corner of the My Computer window.
To finish the dialer setup, refer to Step 22.
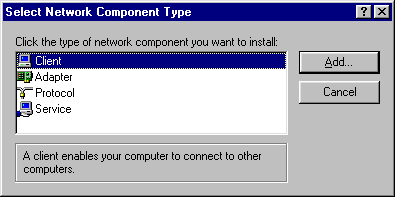
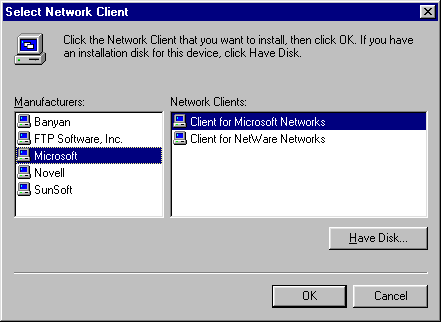
19a.) Click on Add, highlight Client then click on Add again
(sample screen below).
19b.) Highlight Microsoft (in the Manufacturers window), then Client for
Microsoft Networks
(in the Network Clients window), and click OK
(sample screen below).
Return to step 17.
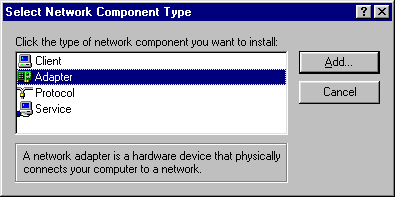
20a.) Click on Add, highlight Adapter and click on Add again
(sample screen below).
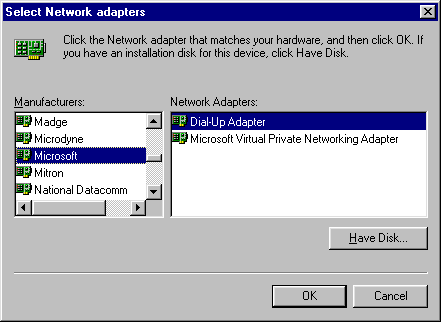
20b.) Highlight Microsoft (in the Manufacturers window), then
highlight Dial-Up
Adapter (in the Network Adapters window), and click OK
(sample screen below).
Return to step 17.
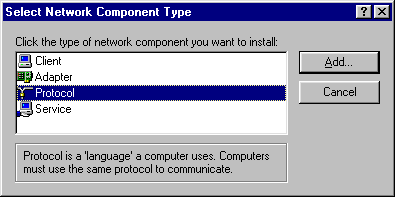
21a.) Click on Add, highlight Protocol and click on Add again
(sample screen below).
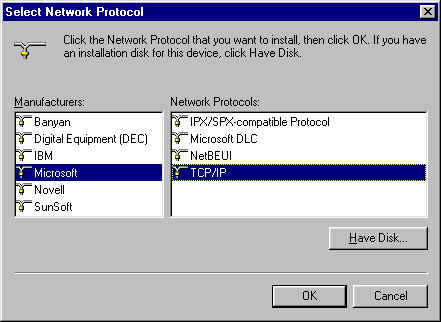
21b.) Highlight Microsoft (in the Manufacturers window), then highlight
TCP/IP
(in the Network Protocols window), and click OK, then return to
step 17.
22.) To test your CVC Internet dialer for correct configurations, double-click on your CVC Internet icon (on your desktop). This will open an Connect To window. In this window, make sure your CVC Internet username is in the username box (@cvc.net should not be listed), then type the password in the password box (if the password is automatically listed, do not enter any information). At the bottom of the Connect To window, click on the Connect button. The next window to appear, will indicate the modem dialing into the server, then verifying the password and username. Once the connection is established, the connection speed and time will appear.
Please Note: you will not be able to access the Internet, until the browser configurations are in place. To continue with the setup, click on the Disconnect button in the connection window, then refer to Browser/Mail configurations listed below.
If you are unable to establish an Internet connection, recheck the dialer settings. Make sure your CVC Internet username and password are in lowercase (@cvc.net should not be listed). Next, make sure the Area Code is 541, and Dial-in Number reflects your CVC Internet Dial-in Number. If all of the information checks fine, and an Internet connection still can't be established, re-boot your computer (close all programs, shut off computer and monitor for at least 5 minutes). Once your system has been refreshed, try re-establishing an Internet connection. If everything fails, check to see if your modem is configured correctly. If the modem is not configured, contact your computer distributor and/or computer repair shop to get your modem fixed. CVC Internet is only responsible for providing Internet access. If your equipment or programs are not working correctly, you will need to contact the appropriate people to fix the problems.
Once your dialer is working correctly, Do Not Change Your Settings! This will only cause you unnecessary problems.
- Step 2 - Browser Configurations -
1.) On the desktop (computer's main screen), double-click on the My Computer icon.
2.) In the My Computer window, double click on the Control Panel icon.
3.) In the Control Panel window, double click the Internet icon.
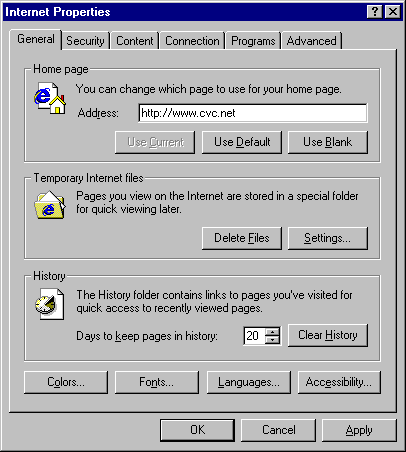
4.) In the Internet Properties screen, select the General tab.
On the General tab screen, Home Page
section, Address box: enter http://www.cvc.net.
At the bottom of the Internet Properties window, click on the Apply button.
(sample screen below)
5.) Go to the top of the Internet Properties window, and click on the Connection tab.
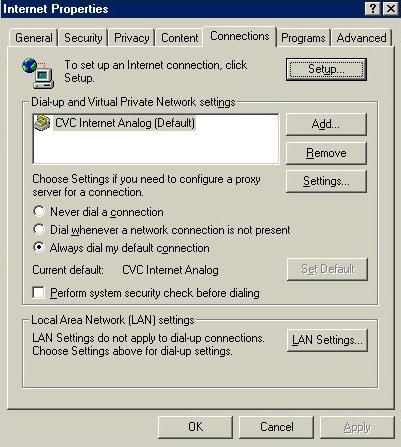
6.) In the Connection screen, complete the following:
In the "Dial-up and Virtual Private Network settings" field, make sure CVC Internet is showing as the default setting.
Select the option: "Always dial my default connection."
(sample screen below)
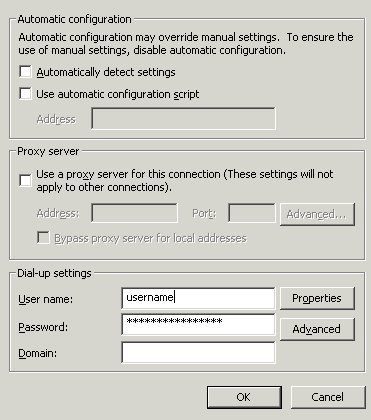
7.) Click on the Settings button (to the right hand side of the Dial-up and Virtual Private Network screen). In the Settings screen, enter the following items:
At the bottom of the Settings screen, enter your CVC username (lowercase characters, no spaces and do not add @cvc.net)
In the Password field enter: your CVC password (lowercase characters, no spaces)
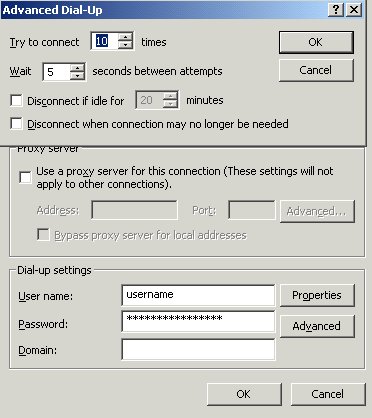
Click on the "Advanced" tab (to the right of the password field)
(sample screen below)
8.) In the Advanced screen unmark the following:
Disconnect if idle for 20 minutes
Disconnect when connection may no longer be needed
At the top of the Advanced screen, click OK. In the Settings screen, click OK to return to the Connection window. Click Apply at the bottom and then OK to return to the Control Panel. Close the Control Panel (click on the "X" in the top right corner).
- Step 3 - Mail Configurations -
2.) If a "Connection Wizard", or a "Connect To Window" appears, cancel it.
3.) Click on the "Tools" menu (at the top of the Outlook
Express window),
and select "Accounts"
(see
sample screen below).
4.) In the "Internet Accounts" screen, click on the "Mail" tab.
5.) If you have a existing account listed in the "Mail/Account" window, and would like to remove this account before creating a new account, click once on the mailbox (shown underneath the Account menu), then click the Remove button. When a window appears, asking you if you want to remove the account, click Yes.
Please Note: If there is no Account shown in the Mail (tab) window, or you wish to keep the current Account and create a new CVC mail account, skip this step and go to step #6.
6.) Next, click the "Add" button (on the right-hand side
of the Internet Accounts window),
and select "Mail"
(see sample window below).
7.) In the next window "Your Name", in the
"Display" field, enter: your real name, then
click on the
"Next" button (sample window below).
8.) In the next window "Internet E-mail Address", in the field "E-mail Address", enter: e-mail address (in lowercase, no spaces), then click on the "Next" button (sample window below).
9.) In the next window "E-mail Server Names", complete the following (see sample window below):
Click on the Next button (on the bottom of the screen).
10.) In the next screen, "Internet Mail Logon", enter the following (sample screen below):
Click on the "Next" button (at the bottom of the screen).
11.) In the next window "Congratulations", click the "Finish" button (see sample screen below).
12.) In the "Internet Accounts" window, click once on the mail.cvc.net Account, then click on the "Properties" button (on the right-hand side menu).
In the "mail.cvc.net Properties" window, click on the "General" screen, and complete the following (see sample below):

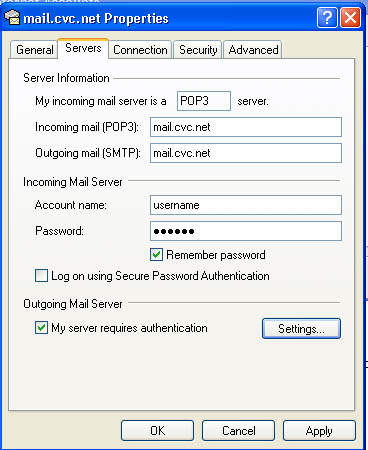
13.) At the top of the" mail.cvc.net Properties" window, click on the "Servers" tab.
In the "Servers" screen, "Server Information" section, complete the following (sample screen below):
In the next section "Incoming Mail Server", complete the following:
14.) In the "mail.cvc.net Properties" window, click on the "Connection" tab.
In the "Connection" screen, select the option "Always connect to this account using", then select "CVC Internet" (in the white field, underneath "Always connect to this account using").

15.) In the "mail.cvc.net Properties" window, click on the tab "Security".
In the "Security" screen, the only option that should be active, is the "Algorithm (3DES)".
(sample window below)
16.) In the "mail.cvc.net Properties" window, click on the tab "Advanced".
In the "Advanced" screen, check the following options (see sample below):
In the section "Server Timeouts", move the arrow to: Long 5 minutes
In the section "Sending", Do Not select the option "Break apart messages larger than".
In the section "Delivery", Do Not select the option "Leave a copy of messages on server".
17.) At the bottom of the "mail.cvc.net Properties" window, click on the "Apply" button, then click on the "OK" button.
18.) In the "Internet Accounts" window, click on the "Close" button.
19.) In the "Outlook Express" main window, click on the "File" menu (located at the top of the Outlook Express window), then select "Close".
Your Finished! For more information on using e-mail or browsing the
Internet, refer to the "Help" menu,
located within the software
program.
Microsoft
Products
- Software Technical
Information -
FAQ’s Online Database
http://support.microsoft.com/directory/
Phone:
1-425-635-7222 (Windows 98/2000)
Phone:
1-425-635-7000 (Windows 95)
Phone:
1-425-635-7123 (Internet Explorer)
Phone:
1-425-637-9308 (Microsoft Programs)
<<<<< BACK TO CVC INTERNET'S HELP GUIDE
Copyright © 1996-2008, CVC Internet, LLC. All
rights reserved.
Certain
names, logos, designs, titles, words or phrases on
this site may
constitute trademarks, service marks or trade names
of CVC Internet, LLC.,
or other entities which may be registered in certain
jurisdictions.
This
web site contains links to other Internet sites, and
such links are not
endorsements of any products or services of such
sites, and no information
in
such Internet sites has been endorsed or approved by
CVC Internet, LLC.
CVC
Internet, LLC. disclaims any responsibility, if some
web site you link
to has material on it that offends you in any way.
If problems or
questions arise with the use of any of the linked
web sites, please
contact the company that owns or operates the
Internet site.